
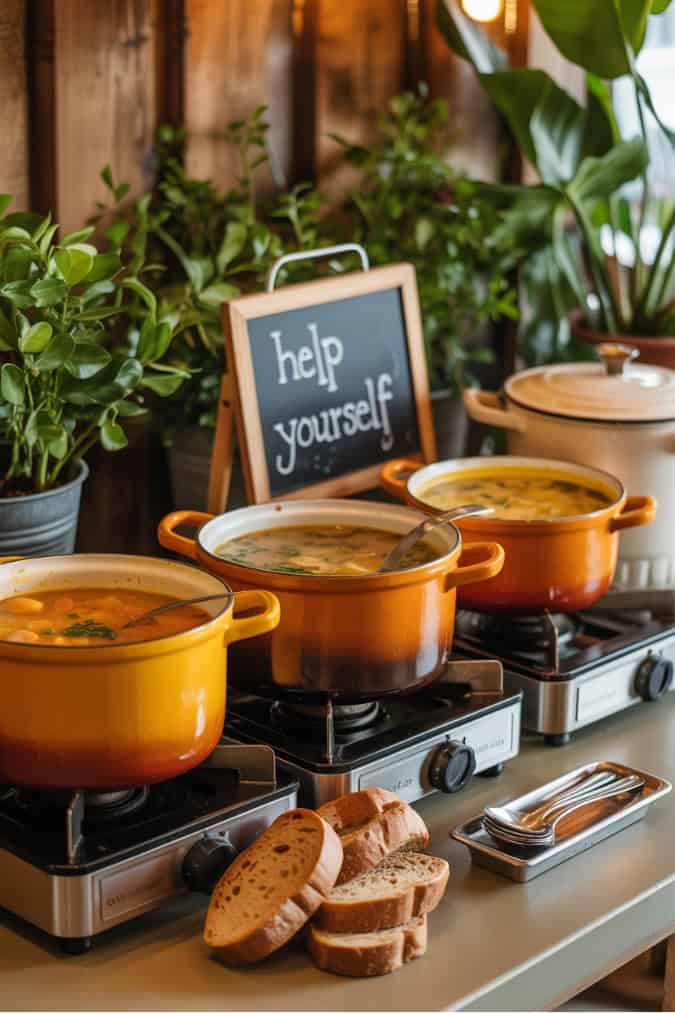
Thinking about serving soup at your wedding?
It’s one of those ideas that feels quirky, cozy, and a little overwhelming all at once.
You might find yourself wondering whether guests can really ladle their own bowls without chaos, or if your venue will even allow soup kettles.
In this guide, I’ll walk you through everything from that first “Is this even possible?” moment to the final details of execution.
By the end, you’ll have a clear roadmap for creating a soup bar that feels seamless, inviting, and completely memorable.

1. Assessing Feasibility: Venue & Caterer Conversations
Before you fall in love with roasted butternut or chilled cucumber-avocado options, talk to your venue coordinator.
Some outdoor sites lack the power or shelter for heated kettles; upscale ballrooms may insist on licensed caterers handling hot food.
If your venue provides in-house catering, ask if they’ve ever done a soup station. They might already have the equipment and insurance.
If you’re bringing in an outside caterer, verify they carry appropriate hot-food permits and have experience with buffet-style services.
Renting a few chafing dishes for soup might seem simple, but insurance policies and fire codes can complicate things, so iron out those details early.
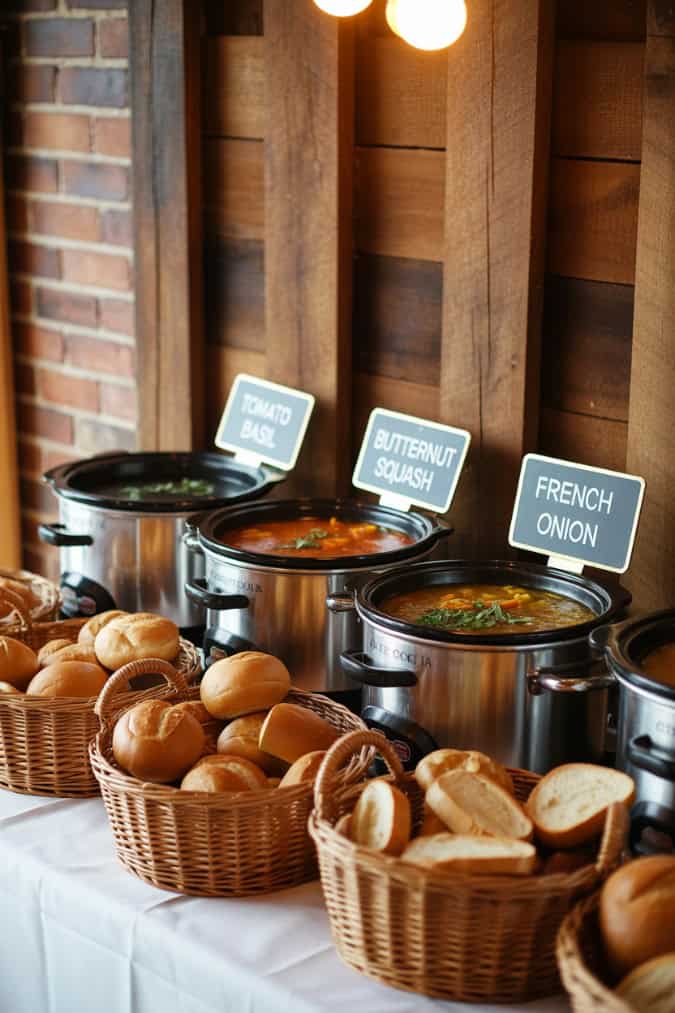
2. Choosing DIY vs. Full-Service Caterer
If you’re a seasoned home cook with supportive family and friends, a DIY soup bar can be wonderfully personal.
You’ll need enough high-quality slow cookers or insulated soup crocks, plus volunteers to refill and monitor temperatures.
This approach saves money but requires logistical muscle: sourcing, cleaning, and transporting all that gear.
On the other hand, a full-service caterer handles setup, staffing, and cleanup.
They’ll know exactly how long to keep each batch at a safe serving temperature and how to present garnishes attractively.
That peace of mind comes at a premium, but it frees you to mingle instead of manning a soup station.

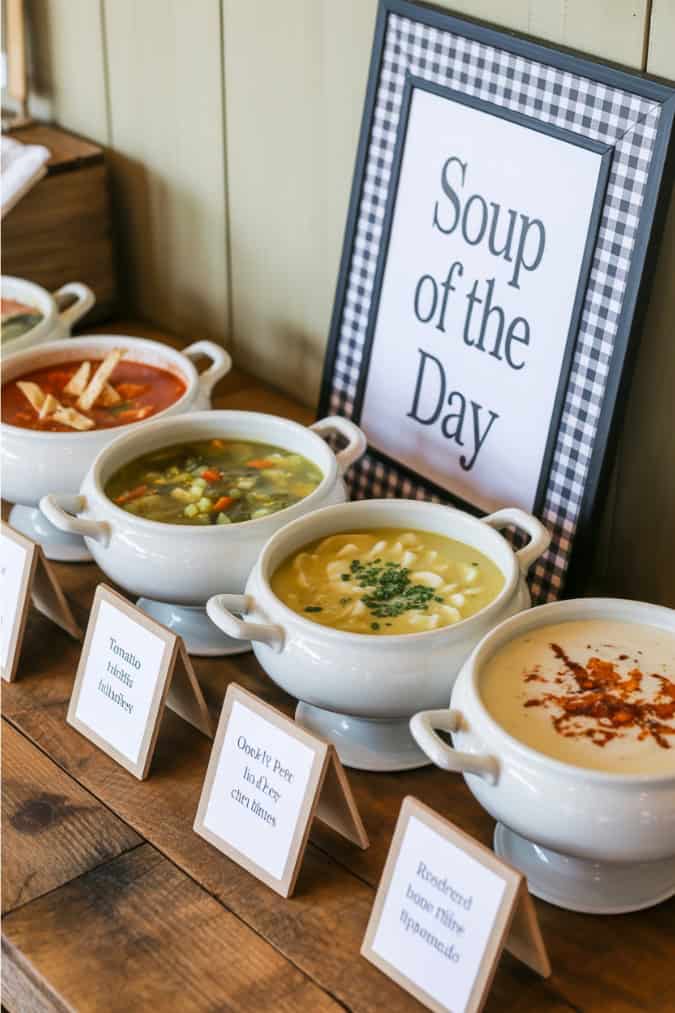
3. Menu Planning: Balancing Creativity, Comfort & Crowd-Pleasers
One of the biggest concerns I hear is, “What if half my guests don’t actually want soup?”
The secret is to build a mini “comfort station” around your soups, so that even the staunchest sandwich-lover or picky eater still feels catered to.
Start with Three Core Soup Styles –
- The Universal Favorite
- Tomato Basil Bisque: Silky, slightly sweet, and recognizable to almost everyone. Top with a swirl of crème fraîche and a scattering of fresh basil ribbons.
- The Seasonal Showstopper
- Autumn Harvest: Roasted pumpkin or butternut squash blended until velvety, brightened with sage-infused olive oil and crunchy seeds.
- The Dietary Dynamo
- Hearty Vegan Lentil or Minestrone: A rich, brothy vegetable base with beans and tender veggies, garnished with herby pistou or a drizzle of extra-virgin olive oil.
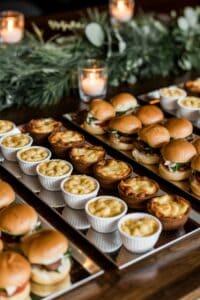
Beyond Soup: “Plan B” Snacks
To make your station irresistible to everyone.
Tuck in a handful of bite-sized sides.
That pair perfectly with your soups and stand on their own if someone skips the ladle:
- Mini Grilled Cheese Skewers: Tiny triangles of cheddar-on-sourdough threaded on cocktail picks—crispy outside, gooey inside.
- Artisan Slider Buns: Offer pulled-pork or roasted-mushroom sliders alongside a mild soup.
- Savory Hand Pies: Think spinach-feta empanadas or sausalge rolls—easy to eat and pre-portioned.
- Bread Board Variety: A selection of crusty rolls, focaccia squares, and soft pretzel bites with flavored butters or spinach-parmesan dip.
Labeling & Allergen Management
Clearly mark vegan, gluten-free, and dairy-free options on elegant tent cards.
Place small icons next to each soup and snack—leaf for vegan, “GF” for gluten-free—so guests can choose with confidence.
Tasting Flight & Portion Control
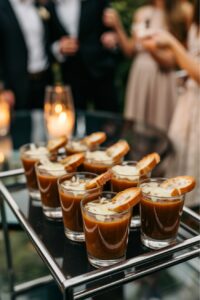
If you’re worried about waste or long lines. You could offer 2–3-ounce “tasting flights” in shot-glass cups.
This way each guest can sample every flavor before committing to a full serving.
Then, when they choose their favorite, they can pick up a 6-ounce bowl
Keeping portions modest and the line moving briskly.
Final Recipe-Testing Tip
Schedule a tasting with your caterer. Or host a small rehearsal dinner.
Ask a handful of friends to score each option on flavor, texture, and “would you actually eat this after dancing?”
Fine-tuning at least two weeks before the big day gives you time to adjust seasoning or swap in a new side if something’s not hitting the mark.
With this layered menu approach, you’ll delight soup lovers while ensuring everyone walks away satisfied.
That’s how you balance creativity, comfort, and crowd-pleasing practicality in one cozy, memorable station.
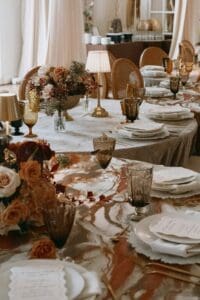
4. Designing a Seamless Layout: Marrying Spectacle with Practicality
Your soup bar can be more than a food station.
It can become a sculptural centerpiece that guests remember long after the catering van has pulled away.
But for it to feel effortlessly elegant, every aesthetic choice must be underpinned by logistical precision.
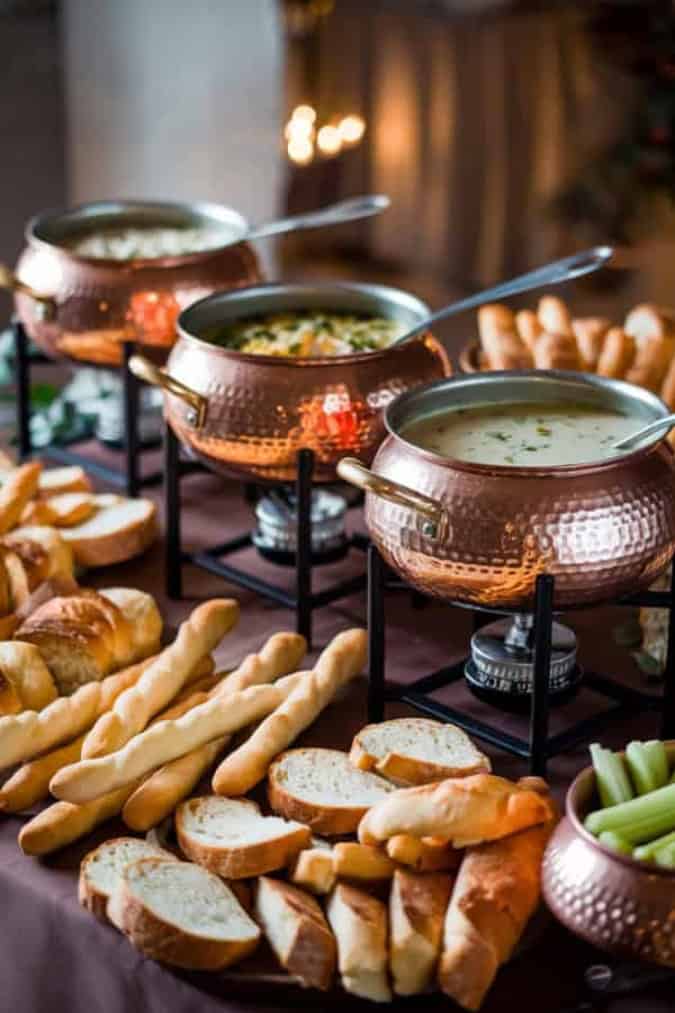
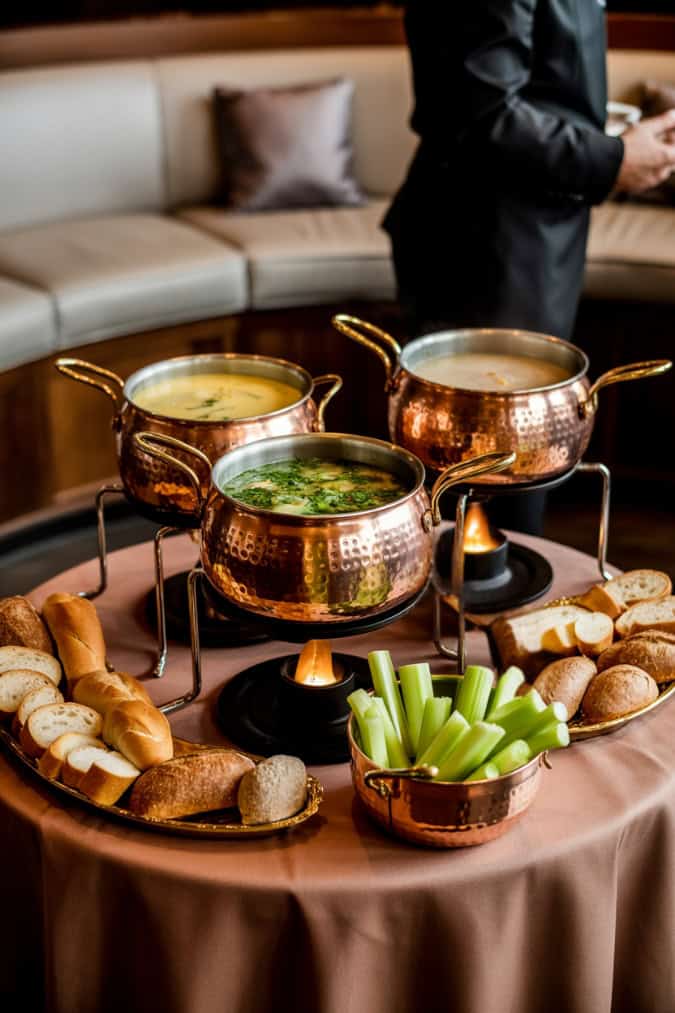
“When we first sketched out our station, we imagined a trio of gleaming copper kettles arranged like oil lamps on a vintage buffet.
In practice, though, those pots looked stunning but cooled off faster than we’d hoped. So glad we tested!
So we swapped for electric-heated soup crocks hidden beneath copper cloches.
That way, the shine stayed front and center while the heat stayed locked in beneath. “
– Bride: Louise
If you love copper or cast iron for drama, test each vessel’s heat retention.
Fill them with hot water in your home kitchen, time how quickly they drop below 60 °C.
Adjust by adding warming burners, insulated liners, or electric elements.
Position & Proportion
Imagine your guests lining up. Are they stooping to reach a low-lying table, or craning to peer over a tall buffet?
Aim for a tabletop height of around 90 cm. Comfortable for an average adult to serve themselves without discomfort.
Pot rims should sit no higher than 10 cm above that. Ladles can then glide in smoothly and guests don’t have to hoist bowls above shoulder level.
Place the station at least 1.5 meters from high-traffic zones like the dance floor or entrance.
Carve out a dedicated alcove that feels inviting rather than cramped.
Power & Access
Copper kettles without lids look divine under fairy lights, but uncovered pots invite spills and cold soup.
Before you commit to open vessels, map out your power sources.
Electric soup kettles need outlets every 1.5 meters; chafing dishes demand floor-safe fuel placements.
Tape down cords, hide them behind skirting. Ensure any gas or fuel canisters are stowed discreetly beneath the table
In a locked box if required by venue fire codes.
Consult a lighting technician or your venue’s AV team.
Hang soft lanterns or dimmable uplights that highlight your station.
Without casting harsh shadows on the soup’s surface.
Flow & Finesse
If you expect 100+ guests to pass through. One buffet line will choke the room.
Instead, break your station into two mirror-image pods.
One featuring warm classics, the other seasonal specials. Separated by a low floral arrangement.
This not only looks intentional, it halves your queue times.
For a barn or industrial venue, consider repurposing a vintage bar cart or butcher-block island on wheels.
Guests love the novelty, and staff can easily roll it back to the kitchen for refills.
Signage & Storytelling
Finally, tell your soup’s story.
A hand-lettered sign on reclaimed wood that reads “Grandma’s Fire-Roasted Tomato” invites nostalgia
A brushed brass frame that proclaims “Autumn Harvest with Pepita Crunch” evokes elevated luxury.
Pair each station with a small card that explains flavor notes and garnishes.
Lean into textures, linen napkins, stoneware bowls, or even mini slate placemats add depth.
When design and logistics are in perfect harmony.
Your soup bar transcends mere sustenance and becomes an unforgettable design moment.
5. Equipment & Safety Essentials
No matter how gorgeous your pots are, safety is non-negotiable.
Chafing dishes are a classic choice, but they require fuel canisters and attentive monitoring to prevent dry-boil hazards.
Insulated electric soup kettles are more foolproof. Simply plug them in and set a consistent temperature.
Wherever you choose, secure cables with floor covers to avoid trip hazards.
Assign one person, either a caterer’s staff member or a trusted friend, to check temperatures every 30 minutes and replenish garnish bowls.
That extra set of eyes keeps service both safe and smooth.
6. Garnishes & Presentation: From Ordinary to Instagram-Worthy
Soup is all about contrast: creamy base meets crunchy topping.
Instead of scattering a single garnish table, create a “topping trio” station.
Offer homemade croutons flavored with rosemary, toasted pumpkin seeds, and a selection of finishing oils or flavored salts.
Display each garnish in matching bowls on staggered wooden risers.
Include a small card suggesting pairings like “Sprinkle on tomato basil bisque for an herby kick.”
For vessels, mini bread bowls add a playful edible element, while petite enamel mugs evoke a homey vibe.
7. Timing & Guest Flow
Decide upfront when you want your soup bar to shine.
For a fall or winter wedding, starting with soup during cocktail hour.
It tames pre-dinner hunger and gives guests a reason to collect around the station. It can also a stater so just serve mains and dessert after.
If you prefer soup as a late-night comfort, plan to switch on the kettles a few hours after wedding breakfast.
Coordinate with your DJ or MC to make a quick announcement (“Our soup bar reopens at 10:30 for late-night cravings!”), then watch the line form happily.
8. Common Pitfalls & Pro Tips
Couples often underestimate how fast soup stations empty out. Always plan for at least 1.5 servings per guest.
Bulk-buy ingredients and cook in large batches. Or ask your caterer to double-batch popular flavors.
Another hiccup: people love customizing, which can slow down lines.
Keep bowls small (4–6 ounces) so refills are swift, and encourage guests to taste all options before committing to a full serving.
Finally, weather can betray you: wind can blow out chafing-fuel flames, and rain might short electric kettles.
Always have a backup plan, extra crock-pots kept under a tent or inside the kitchen.
Your Soup Bar Step-by-Step Action Plan
Confirm Logistics with Venue
- Verify power availability, approved heating methods (electric kettles vs. chafing fuel), and any fire- or health-code requirements.
- Ask about in-house equipment or preferred vendors.
Decide DIY vs. Caterer
- If DIY: inventory slow cookers, insulated crocks, fuel canisters, and volunteers.
- If using a caterer: secure their soup-bar package and equipment list.
Plan Your Menu & Garnish Bar
- Select your three core soups (crowd-pleaser, seasonal special, dietary option).
- Choose 4–6 complementary garnishes and 2–3 snack “plan B” items (mini grilled cheeses, sliders, hand pies).
- Draft clear labels with dietary icons.
Test & Finalize Recipes
- Cook each soup, taste for seasoning and texture, and adjust as needed.
- Time how long each vessel retains heat; add burners or electric elements if necessary.
- Plate “tasting flights” for friends/family to collect feedback on portion size and flavor.
Design Your Layout Sketch
- Map out station height (around 90 cm), distance from high-traffic areas (minimum 1.5 m), power outlets, and seating clusters.
- Decide on single vs. dual pods; incorporate decorative elements without obstructing access.
Prepare Signage & Supplies
- Print soup and garnish labels, allergy icons, and directional signs.
- Pack garnishes, utensils, bowls, napkins, and cord covers in clearly labeled bins.
Event Day Setup & Briefing
- Arrive at least 1–2 hours early to position equipment, plug in kettles, light chafing dishes, and test temperatures.
- Brief staff or volunteers on refill schedules, temperature checks, and spill protocols.
Service & Monitoring
- Keep an eye on soup levels and heat every 30 minutes.
- Refill bowls of garnishes and snacks promptly.
- Offer gentle reminders to guests when late-night soup service begins (if applicable).
Cleanup & Breakdown
- Coordinate with caterers or volunteers to pack up equipment and transport dirty pots.
- Gather signage, bins, and any reusable decor for return or storage.
More blogs you will love!
- Modern Winter Bridal Shower Themes

- Après Ski Bachelorette Party Ideas
- 20 Modern Winter Wedding Centerpiece Ideas
- 20 Winter Cocktail Hour Ideas for Weddings
- 20 Winter Finger Food Ideas for Weddings
- Easy DIY’s Perfect for a Winter Wedding

- Top Winter Bachelorette & Hen Party Ideas for a Cozy, Stylish Celebration

- Fall 2025 Wedding Tablescapes: 9 Inspiring Trends to Steal for Your Big Day
- Modern Fall Mother of the Bride Dress for 2025 weddings