
Taking on some DIYs for your wedding is a great way to save money. It doesn’t need to be complicated or overwhelming.
Sometimes the simplest DIYs are the ones that make the biggest impact — and they don’t need to cost a fortune or take up your entire weekend.
I’ve pulled together a list of my favourite easy fall wedding DIY ideas that anyone can do, whether you consider yourself crafty or not. These are quick wins that still look thoughtful and stylish — perfect if you want those cosy autumn vibes without the stress.
Most of them use things you probably already have at home or can grab cheaply online, and I’ve linked to full DIY tutorials and free templates where I’ve made them. So if you’re looking for practical ways to add a seasonal touch to your wedding, you’re in the right place. Let’s get stuck in.
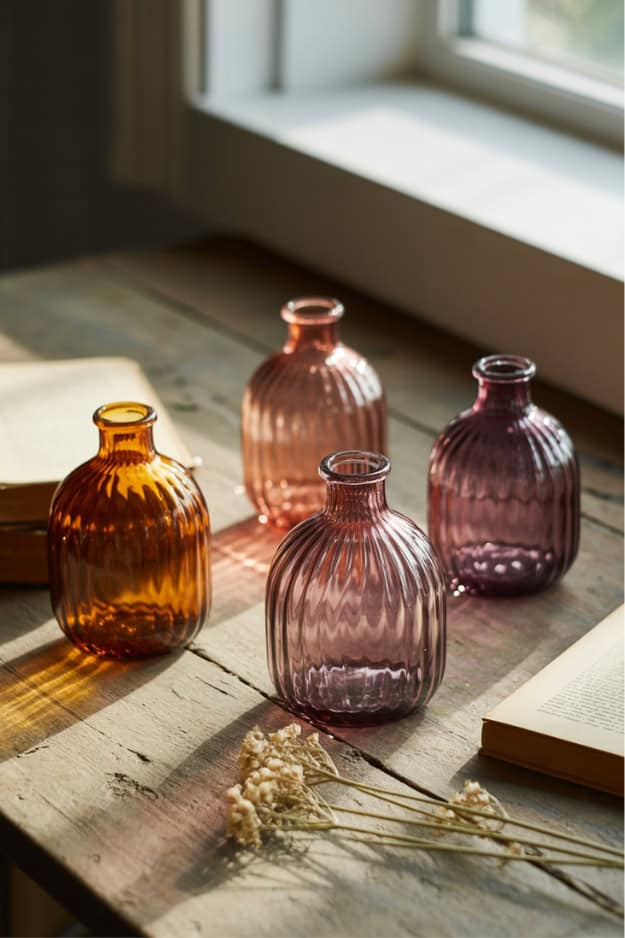
1. Tinted Glass Bud Vases
This is one of those DIYs that feels like magic. You just mix a bit of food colouring with Mod Podge or glue, swirl it inside a plain glass bud vase, and let it dry upside down.
The result is a beautifully tinted, vintage-looking vase in whatever fall shade you like, amber, rust, or even smoky plum.
They look especially good grouped in threes or paired with dried stems.
See the full DIY tutorial with color mixing tips here.
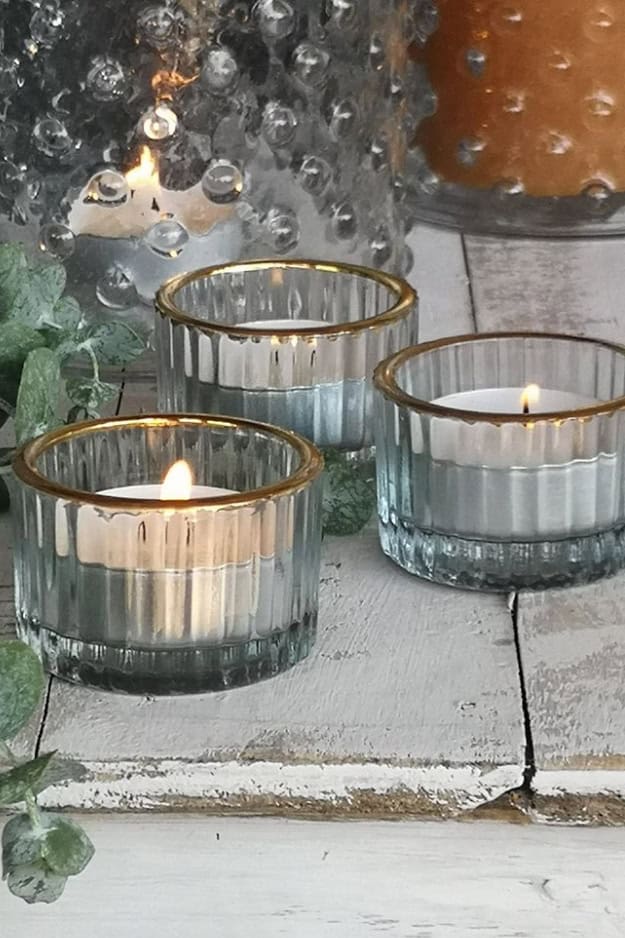
2. Gold-Top Candle Holders
These are perfect if you’re using lots of tealights or votives and want them to look a bit more polished. I used painter’s tape to mark off the bottom half of the holders, then flipped them over and dipped the tops in gold spray paint. They look great with glass, but you can also try it on ceramics or even jars. You can mix in a few with copper or bronze tones too if you want variation on your tables.
[Full step-by-step guide on the blog.]
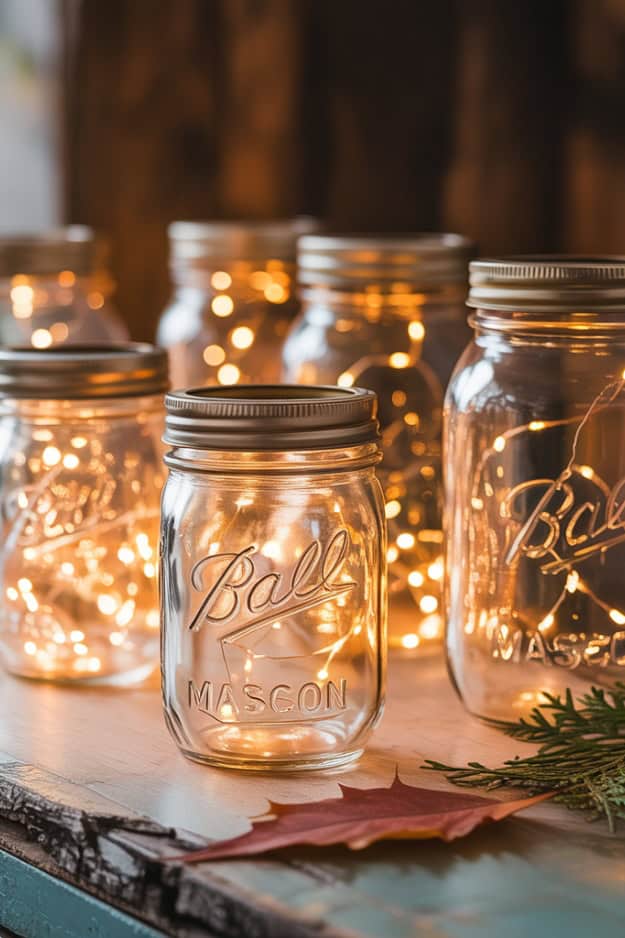
3. Fairy Light Mason Jars
If you’re getting married later in the day or heading into a barn or outdoor reception, these are a must. I filled mason jars with warm-toned fairy lights and used them to line walkways and add glow to darker corners. Battery-operated ones keep it fuss-free, and you can even add dried leaves or acorns in the bottom of the jars for a seasonal twist.
[Check out the full DIY with styling ideas.]

4. Roasted Pumpkin Seed Favor Jars
Such a simple and thoughtful edible favor idea. Roast pumpkin seeds with your favourite flavouring — I love doing a sweet cinnamon batch and a savoury one with rosemary and salt — and pack them into mini jars. Add a little tag and something like a sprig of dried gold foliage or twine to dress it up. You’ll find the roasting tips and free printable tags in the tutorial.
[Full recipe and free tag download here.]
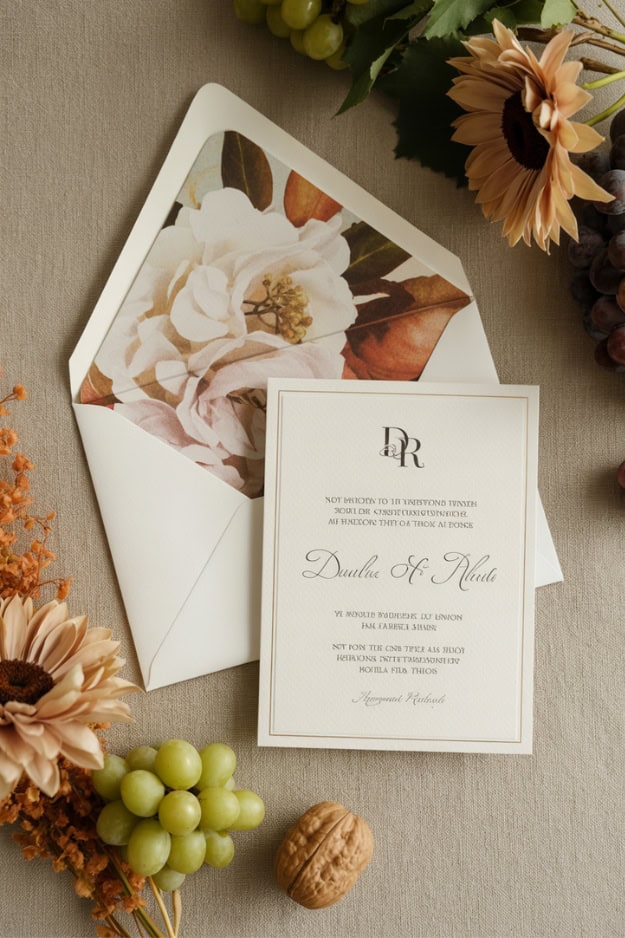
5. Save the Dates with Fall Envelope Liners
Adding a liner to your save the dates makes them feel instantly more styled without having to design full-on custom stationery. I’ve created some printable fall envelope liners you can just trim and glue in. Choose one design or mix and match patterns if you like that layered look.
[Free envelope liner templates and instructions on the blog.]
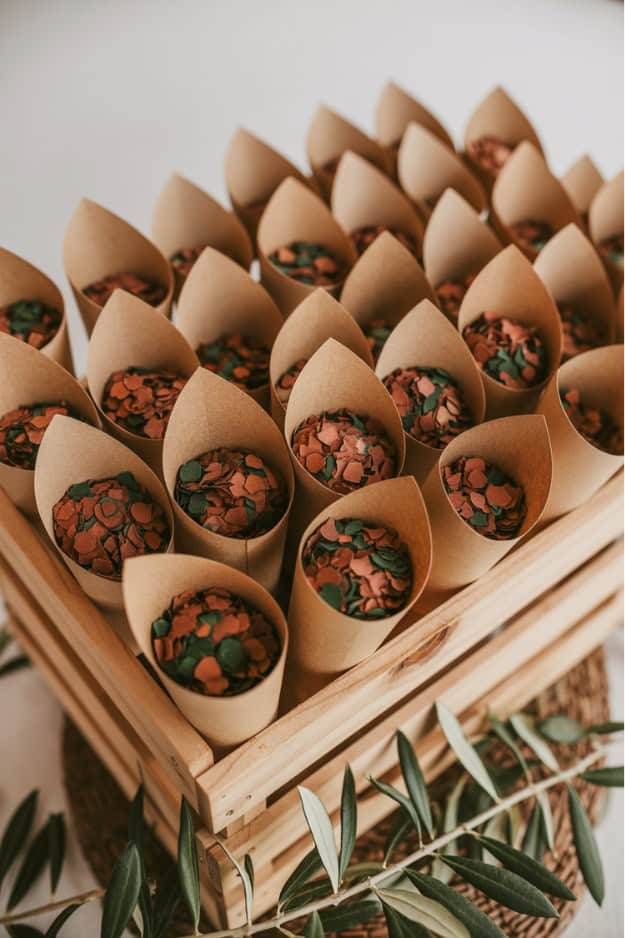
6. DIY Fall Leaf Confetti Cones
Instead of the usual paper confetti, I used faux autumn leaves and a hole punch to create something that actually feels seasonal. You can also just tear them into smaller pieces if you want it to look more organic. I packaged the confetti in cones made from kraft paper using a printable template that folds neatly and holds just the right amount.
[Grab the free cone printable and full DIY here.]
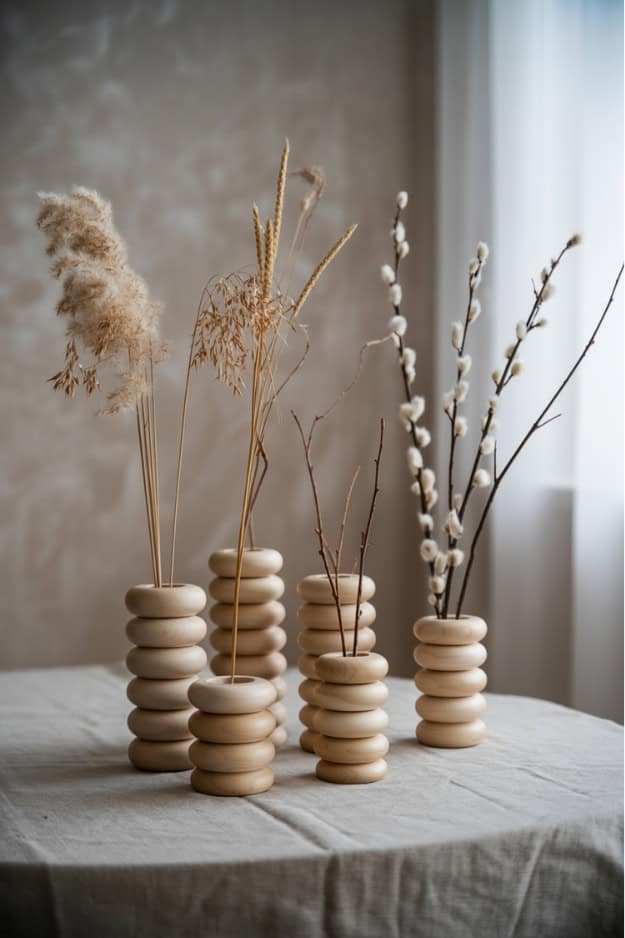
7. Wooden Hoop Vases
I love this one because it takes minutes but makes a big difference. Just wrap embroidery hoops around old jam jars or glass cylinders — two or three stacked depending on the size. You can leave the hoops natural, stain them darker, or even paint them for a modern twist. These work especially well for dried flowers, or even as part of a centrepiece cluster.
[Find the full guide with sizing tips on the blog.]
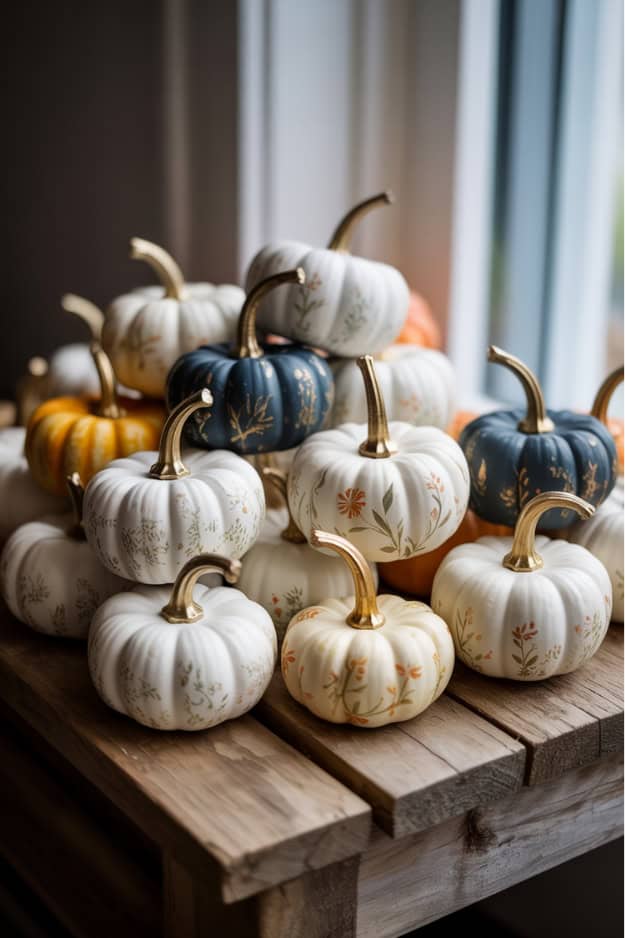
8. Painted Pumpkins
Mini pumpkins are everywhere in autumn, and they’re so easy to transform. I painted mine in a mix of colours that matched the rest of the wedding, soft sage, creamy white, terracotta with pops of blue. You can keep them matte or add a satin topcoat if you want a bit of shine. They work as table fillers, place settings, or sign decor.
[Full DIY and my favourite colour combos here.]
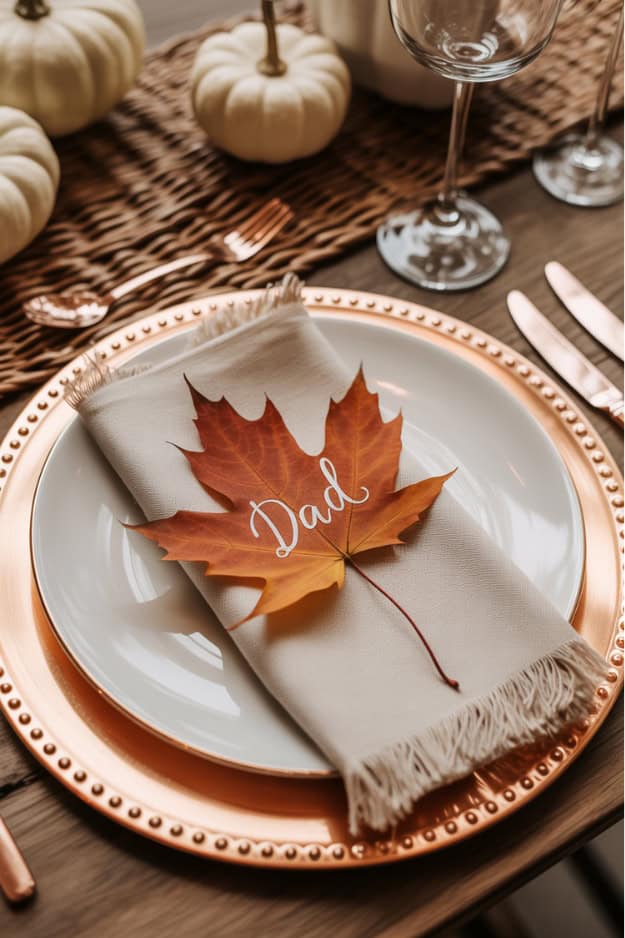
9. Leaf Place Cards
This one is great if you want something natural-looking without being too rustic. I used larger faux leaves (maple or magnolia work well) and wrote guest names using a metallic marker. Lay them on plates, tuck into napkins, or clip them to menus. If you’re feeling extra, you can even hand-stamp them.
[Quick tutorial on pens, leaf types, and styling options here.]
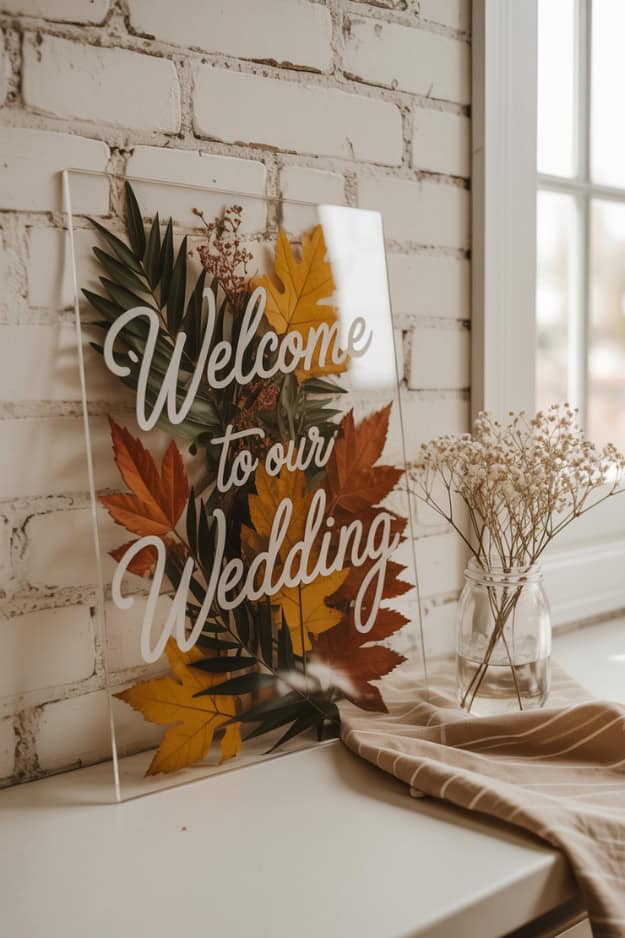
10. Acrylic Sign with Pressed Leaves
This works really well if you want a subtle autumn detail without it going full rustic. I pressed leaves between two acrylic sheets to make a floating-style sign — perfect for a welcome board, bar sign, or table plan. You can keep it super minimal or layer the leaves behind printed lettering for something more styled.
[Step-by-step guide and pressing tips on the blog.]
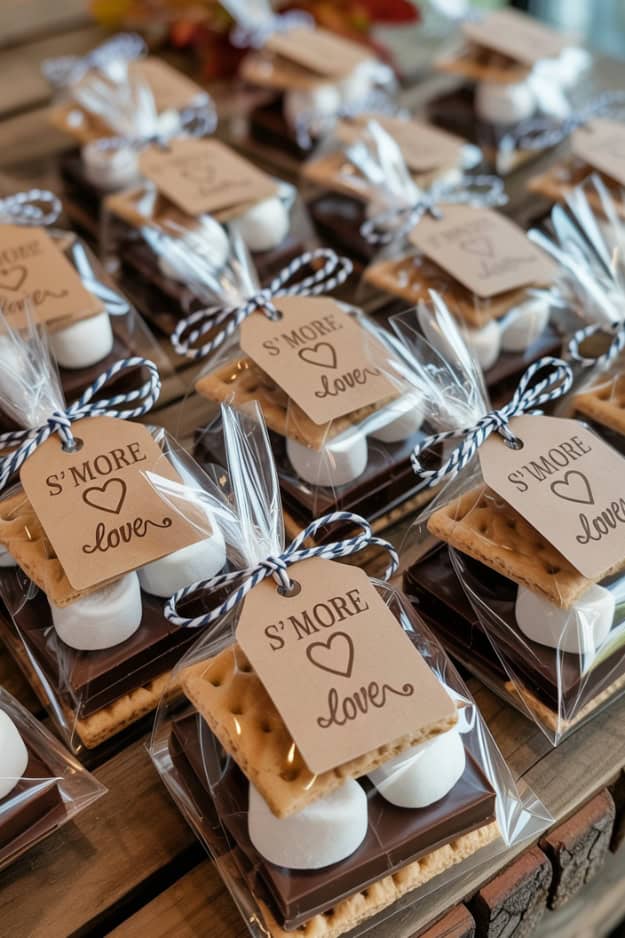
11. S’mores Favor Packs
These are always a crowd-pleaser and they’re so easy to prep ahead. I packed graham crackers, chocolate, and marshmallows into clear cello bags, tied with twine and a cute little tag. You could also use kraft boxes if you want to stack them or pop them in a welcome bag. There’s a free printable tag in the tutorial too.
[Get the full how-to and download the tags here.]
More blogs you will love!
- Fall 2025 Wedding Tablescapes: 9 Inspiring Trends to Steal for Your Big Day
- Modern Fall Mother of the Bride Dress for 2025 weddings

- Soup Bar Simplified: Step-by-Step to a Stylish, No-Fuss Wedding Statio

- 15 Unique Fall Cocktail Hour Ideas Your Guests Will Love
- 15 Fall Cocktail Ideas Perfect for Your Wedding

- 20 Perfect Fall Finger Foods for Your Wedding

- Budget-Friendly Fall Wedding Ideas for Modern Couples
- 9 Fall Wedding Colors You Won’t Believe Are Trending in 2025!
- Stylish Fall Wedding Centerpiece Ideas for a Clean, Contemporary Vibe